Introduction
This guide summarizes the functionality of WebAnno from the user’s perspective.
| It is assumed that you plan to test the WebAnno standalone version or an already existing server installation of WebAnno. For information on how to set up WebAnno for a group of users on a server, please refer to the Administrator Guide. |
All materials, including this guide, are available via the WebAnno homepage.
System Requirements
Browser |
Chrome or Safari |
Java Runtime Environment |
version 7 or higher |
Java Runtime Environment |
version 7 or higher |
Apache Tomcat |
version 6 or higher |
MySQL Server |
version 5 or higher |
Workflow
The following image shows an exemplary workflow of an annotation project with WebAnno.
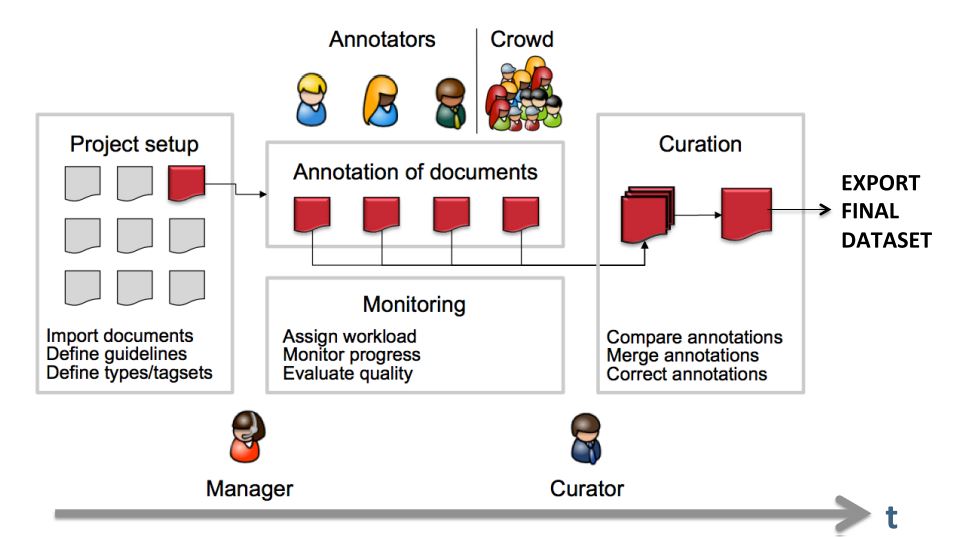
First, the projects needs to be set up. In more detail, this means that users are to be added, guidelines need to provided, documents have to be uploaded, tagsets need to be defined and uploaded, etc. The process of setting up and administrating a project are explicitly described in Projects.
After the setup of a project, the users which were assigned with the task of annotation annotate the documents according to the guidelines. The task of annotation is further explained in Annotation. The work of the annotators is managed and controlled by Monitoring. Here, the person in charge has to assign the workload. For example, in order to prevent redundant annotation, documents which are already annotated by several other annotators and need not be annotated by another person, can be blocked for others. The person in charge is also able to follow the progress of individual annotators. All these tasks are demonstrated in Monitoring in more detail. The person in charge should not only control the quantity, but also the quality of annotation by looking closer into the annotations of individual annotators. This can be done by logging in with the credentials of the annotators.
After at least two annotators finished the annotation of the same document by clicking on Done, the curator can start his work. The curator compares the annotations and corrects them if needed. This task is further explained in Curation.
The document merged by the curator can be exported as soon as the curator clicked on "Done" for the document. The extraction of curated documents is also explained in Projects.
Installation
All-in-one version which does not require a database server or servlet container to be set up.
|
By default, WebAnno creates and uses an embedded database. It is not recommended to use WebAnno in such a configuration for production use. Instead, please configure WebAnno to use a database server when using it in production. For more information, please refer to the Administrator Guide. |
Get the standalone jar from the [WebAnnoInstFile downloads] and start it simply with a double-click in your file manager. WebAnno stores its data in a folder called .webanno (dot webanno) within your home folder,
You can start with the [SampleProjects example projects] to explore some of the functionalities.
|
If you have previously used an older version of the WebAnno standalone, make sure to clean up the temporary installation before running the new version:
|
Optional configuration
Alternatively, you can start WebAnno from the command line, in particular if you wish to provide it with additional memory (here 1 GB) or if you want it to store its data in a different folder.
java -Xmx1g -Dwebanno.home=/my/webanno/home -jar webanno-XXX-standalone.jar
Mind to replace /my/webanno/home with path of a folder where WebAnno can store its data.
By default the server starts on port 8080 an you can access it via a browser at http://localhost:8080 after you started it. You can add the parameter --httpPort=9999 at the end of the command line to start the server on port 9999 (or choose any other port).
A full list of the command line parameters can be found in the Winstone documentation.
Upgrade
This section describes how to upgrade the standalone version of WebAnno using an embedded database. For further information on how to upgrade WebAnno, in particular the WAR version, when using a MySQL database, or older versions of WebAnno, please refer to the Administrator Guide.
Make a backup
Before any upgrade, make a copy of your WebAnno home folder.
| If WebAnno is configured to use an external database, e.g. MySQL, make a backup of this database as well. See the Administrator Guide for further information. |
Upgrade from 2.0.x to 2.1.x
-
clean up the temporary installation before running the new version:
-
On OS X:
rm -R "$TMPDIR/winstoneEmbeddedWAR" -
On Linux:
rm -R /tmp/winstoneEmbeddedWAR -
On Windows: remove the
winstoneEmbeddedWARthat should be somewhere underC:\Users\<username>\AppData\Local\Temp
-
-
start the new version
Logging in
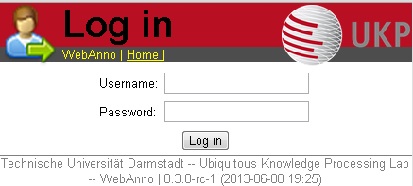
Upon navigating to the WebAnno page, the login screen opens. Please enter your credentials to proceed.
| When WebAnno is started for the first time, a default user called admin with the password admin is automatically created. Be sure to change the passwort for this user after logging in (see User Management). |
Main Menu
After login, you will be presented with the WebAnno overview screen. This screen can be reached at any time from within the GUI by clicking on the Home link in the left upper corner.
Here, you can navigate to one of the currently eight options:
-
Annotation - The page to perform annotations
-
Curation - Compare and merge annotations from multiple users (only for curators)
-
Correction - Correcting automatic annotation (under development)
-
Automation - Creating automatically annotated data
-
Projects - Set up or change annotation projects (only for administrators)
-
Monitoring - Allows you to see the projects, their progress and change documentstatus (only for administrators and curators)
-
User Management - Allows you to manage the rights of users
Please click on the functionality you need. The individual functionalities will be explained in further chapters.
Annotation
| This functionality is only available to annotators, project managers, and administrators. Annotators and project managers only see projects in which they hold the respective roles. |
Opening a Document
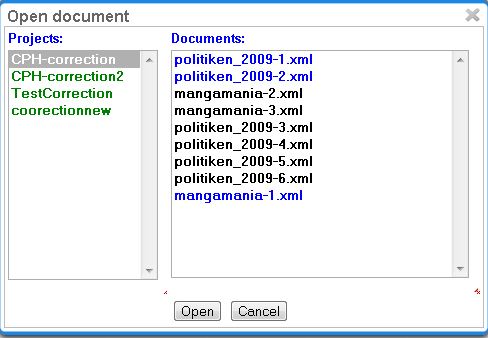
When navigating to the Annotation page, a dialogue opens that allows you to select a project, and a document within the project. If you want to open a different project or document later, click on Open button to open the dialog.
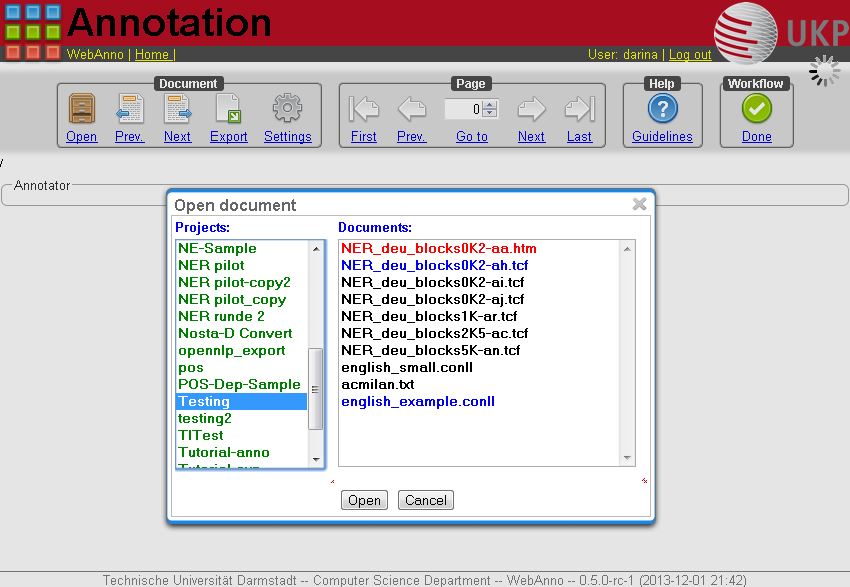
Projects appear as folders, and contain the documents of the project. Double-click on a document to open it for annotation. Document names written in black show that the document has not been opened by the current user, blue font means that it has already been opened, whereas red font indicates that the document has already been marked as done.
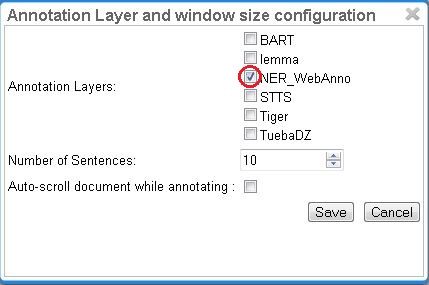
Once the document is opened, a default of 10 sentences are loaded on the annotation page. The Settings button will allow you to specify the settings of you the annotation layer.
The first option allows you to select an Annotation Layer you are displayed during annotation. The second option allows you to specify the number of sentences that will be displayed on one page. The last option allows you to select auto-scroll while annotating. Auto-scroll scrolls automatically forward by putting the last annotated sentence in the middle.
Navigation
Sentence numbers on the left side of the annotation page shows the exact sentence numbers in the document.
The arrow buttons first page, next page, previous page, last page, and go to page allow you to navigate accordingly. The Prev. and Next buttons in the Document frame allow you to go to the previous or next document on your project list. You can also use the following keyboard assignments in order to navigate only using your keyboard.
-
HOME: jump to first sentence
-
END: jump to last sentence
-
PAGE DOWN: move to the next page, if not in the last page already
-
PAGE UP: move to previous page , if not already in the first page
-
SHIFT+PgUp and SHIFT+PgDn: go to previous/next document in project, if available
A click on the Help button displays the Guidelines for the tool and The Annotator’s Guide to NER-Annotation. When you are finished with annotating or curating a document, please click on the Done button, so that the document may be further processed. If the button above the Done is a cross symbol, it means the documents has already been finished. If the symbol has a tick, it is still open.

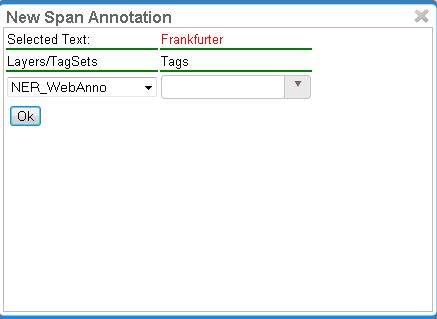
Annotation of spans works by selecting the span, or double-clicking on a word. This opens the annotation dialog, where you can add a new annotation. The layer can be selected on the left side of the frame. The tag can be selected out of the right box, containing the tags of the tagset. One can also type in the initial letters and chose the needed tag. In the case of lemma annotation, a lemma can be typed into the box on the right.
To change or delete an annotation, double-click on the annotation (span or link annotations).
Link annotations (between POS tags) are created by selecting the starting POS-tag, then dragging the arrow to connect it to its target POS tag. All possible targets are highlighted.

Export
Annotations are always immediately persistent in the backend database. Thus, it is not necessary to save the annotations explicitly. Also, losing the connection through network issues or timeouts does not cause data loss. To obtain a local copy of the current document, click on export button. The following frame will appear:
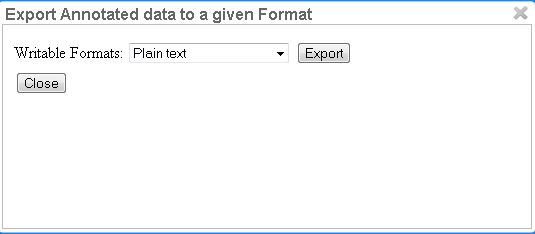
Choose your preferred format. Please take note of the facts that the plain text format does not contain any annotations and that the files in the binary format need to be unpacked before further usage. For further information on the formats provided in WebAnno, please consult the corresponding chapter [OutputFormat WebAnno’s supported formats].
The document will be saved to your local disk, and can be re-imported via adding the document to a project by a project administrator. Please export your data periodically, at least when finishing a document or not continuing annotations for an extended period of time.
Layers
Concerning annotation, WebAnno offers six pre-defined layers: Span annotations support NE, lemma, POS, and co-referance. Several annotation layers may be selected.
Moreover, additional custom layers may be created, as described in Layers in detail.
For example, for NE annotation, select the options as shown below (red check mark):
NE annotation can be chosen from a tagset and can span over several tokens within one sentence. Nested NE annotations are also possible (in the example below: "Frankfurter" in "Frankfurter FC").

Lemma annotation, as shown below, is freely selectable over a single token.

POS can be chosen over one token out of a tagset.

Co-reference annotation can be made over several tokens within one sentence. A single token sequence have several co-ref spans simultaneously.
The other kind of annotation that is supported by WebAnno is Arc. The arcs can be made within one sentence and their types are chosen out of a tagset. Dependency arcs are defined between POS. Every POS is allowed to have only one head. Co-reference arcs are defined between co-reference-anchors. All transitively combined anchors build a colour-coded lexical chain.

Curation
| This functionality is only available to project managers (managers of existing projects), curators, and administrators. Curators and project managers only see projects in which they hold the respective roles. |
When navigating to the Curation Page, the procedure for opening projects and documents is the same as in Annotation. The Page navigation is also equivalent to Annotation.
In the left frame of the window, named Sentences, the sentences of the chosen document are displayed. The ones shaded in red created a conflict in annotation.
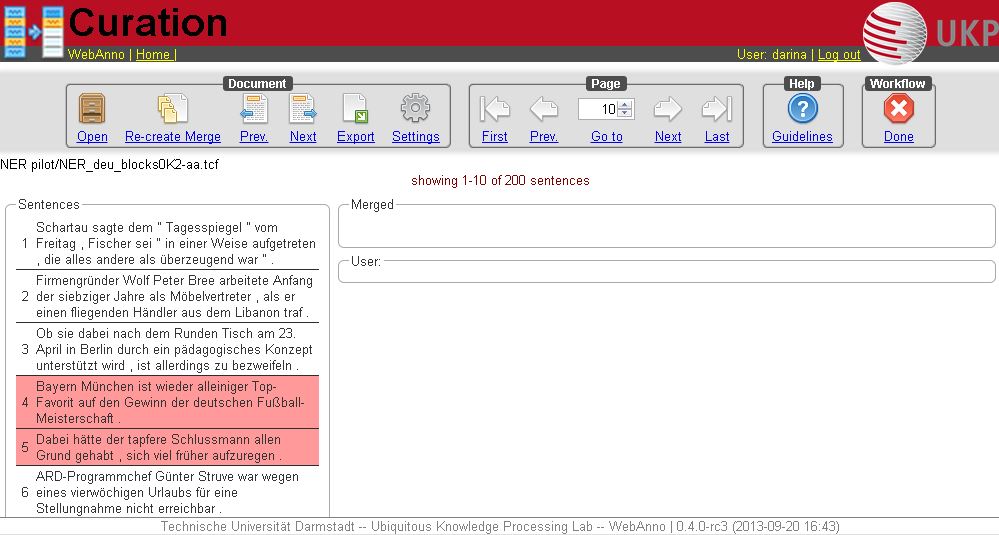
If you want to see the annotations that were made in a sentence, you have to click on the sentence. Then on the right side of the window, the annotations are displayed.
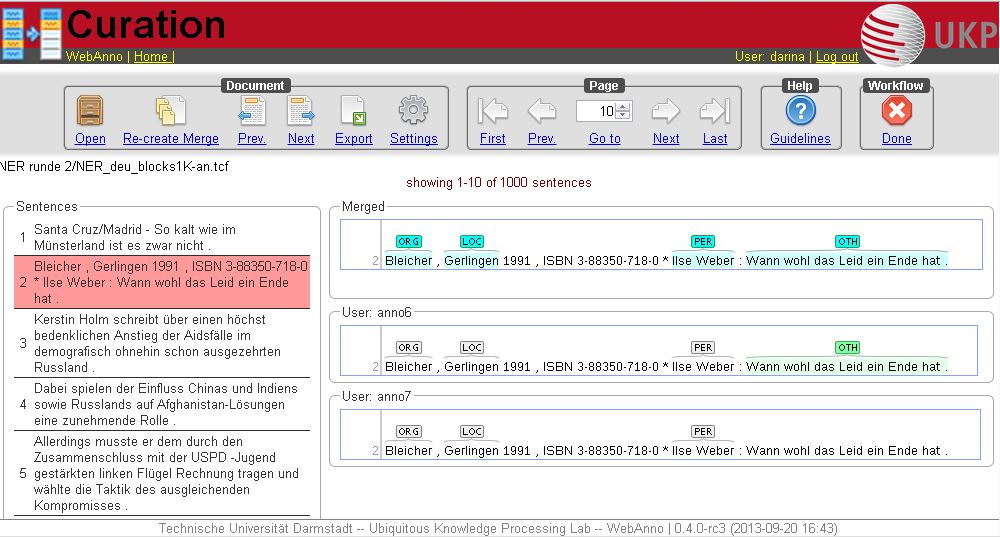
The frame called Merged shows the result of the default merge the conflicting annotations. Below it, the annotated sentences are shown in separate frames, titled with the names of the annotators. By clicking on an annotation in one of the annotator’s frames, you accept the annotation and merge it into the Merged view. The sentence in the merged frame can be treated like a sentence in the Annotation. By selecting a word with a click you are able to produce new annotations, by clicking on an annotation, you are able to change its classification or delete it. The different states of the annotation agreement are marked by different colours. If the annotations were the same, they are marked grey in the lower frames and light blue in the merged frame. If the annotations are disparate, the markings are dark blue in the lower frames. By default, they are not taken into the merged file. If you choose one annotation to be right by clicking on it, the chosen annotation will turn green in the frame of the corresponding annotator. Also, the annotation will say USE next to the classification. The annotations which were not chosen to be in the merged file are marked dark blue. The annotations which were wrongly classified are marked in red.
Light Blue (in upper frame) |
final annotation |
Dark Blue (in the lower frame) |
not chosen annotation |
White (in lower frame) |
chosen annotation |
Red (in lower frame) |
Wrong annotation (same span, other type). |
Correction
| This functionality is only available to annotators, project managers, and administrators. Annotators and project managers only see projects in which they hold the respective roles. |
In this page, already annotated documents may be checked, corrected and enhanced.
Before being able to see and correct documents, make sure to have chosen correction when creating your project in projects. The instruction to do so is on the following page: Projects. Also make sure that the documents you upload are already annotated.
After clicking on the Correction symbol on the main page, the Correction page is opened. In the appearing frame, which is the left one in the image below, the user has to choose a project first.
Afterwards the documents assigned to him are displayed. Now he may choose a document. Just like in Annotation and Curation, the colour of the document names signals the following: black- unopened document, blue- opened document and red - document finished.
After having chosen the document, two frames are displayed.
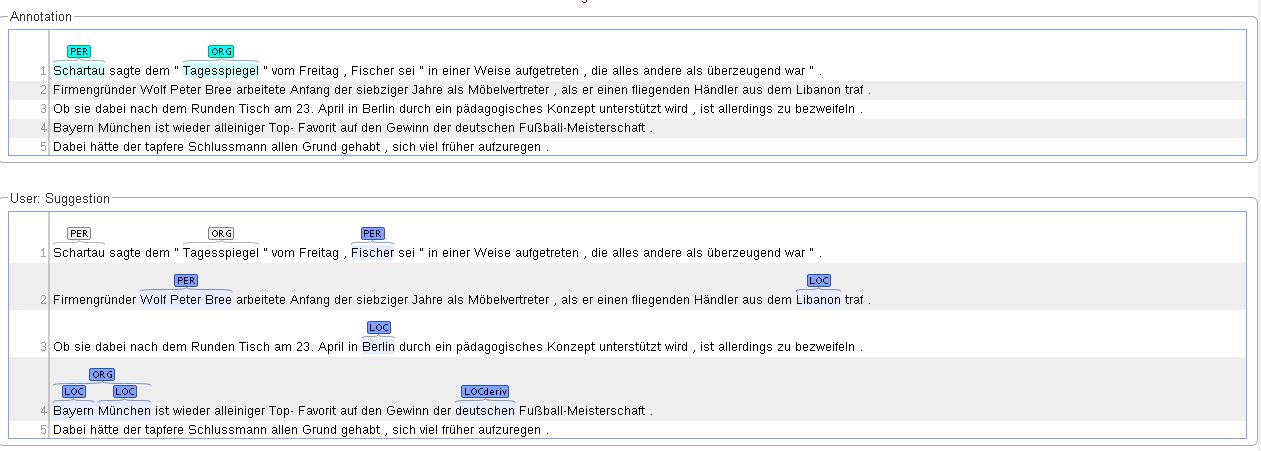
The upper one, Annotation, is the frame in which annotations can be made by the user. Moreover, it displays the chosen annotations. The lower frame, User: Suggestion, displays the annotation that was previously made in the uploaded document. By clicking on the annotations (not the words), they are chosen as right and are therefore displayed in the Annotation frame. Additional annotations may be made just like in Annotation, by selecting the span or relation to be annotated, choosing the layer and tag. For more detailed instruction or the guidelines for the navigation in the upper frames (Document, Page, Help, Workflow), see the guidelines for Annotation. No changes may be made in the lower frame.
The colouring of the annotation signals the same as in Curation.
Automation
| This functionality is only available to annotators, project managers, and administrators. Annotators and project managers only see projects in which they hold the respective roles. |
This functionality gives the possibility to choose features and documents, which can be used for training of all layers that are offered in WebAnno (lemma, NER, POS and co-ref).
Setup
After clicking on Create Project on the Projects page, select automation as your project type. The detailed description may be found in Projects.
The documents, that are to be annotated, have to be uploaded in the frame Documents. Please make sure that the chosen format corresponds to the format of the files you are uploading.
To manage the automation process, choose the Automation frame. The following frame will appear:

First choose your target layer in the Select automation layer frame. If you want to train a non-custom layer, please make sure you created or imported it in the Layer frame (for instructions to do so, see Projects).
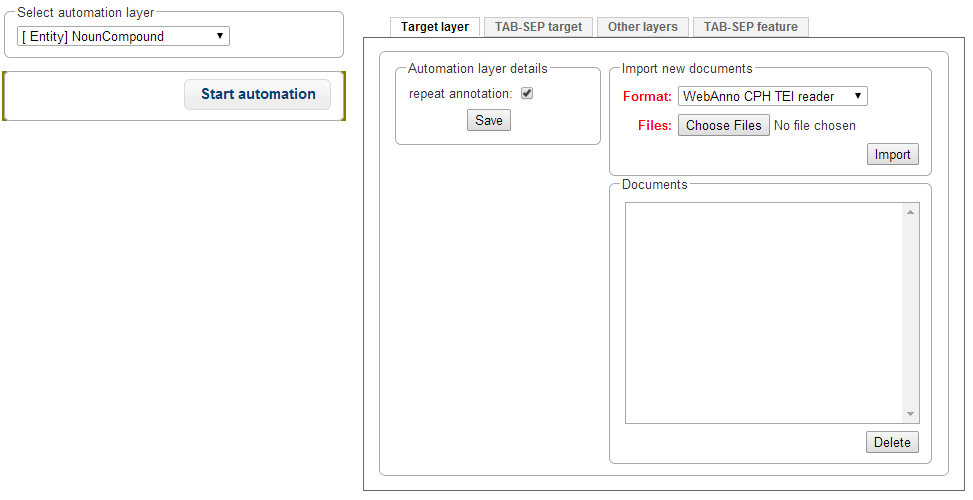
Here you may choose the format of the target layer and optionally add some feature layers on which you want to train.
In the tab Target layer you may upload training files containing the target layer in WebAnno Export formats (WebAnno CPH TEI reader, plain text, binary format, XMI format, old WebAnno Format, WebAnno Format, Weblicht TCF Format, for more information on these formats, see [https://code.google.com/p/webanno/wiki/Format?ts=1407336468&updated=Format Format]).
In the next tab TAB-SEP target, you may upload training files containing the target layer in a tab-separated format, which is structured by writing each single word in a line together with its target tag, separated by a tab. Sentences are separated by blank lines.
The same goes analogically for the feature layers. The Other layers tab gives the possibility to upload WebAnno Export formats and choosing the layers that are to be used in training in the format window. The TAB-SEP feature tab gives the possibility to upload files in the above described tab-separated format, containing the feature tags in the second column. Every file will be regarded as one separate feature.
After choosing the training files, uploading them in the right format and importing them (by clicking on Import), every file will be displayed in the corresponding tab in the frame Documents. Click on the button Start Automation on the left, when you have uploaded your training data. Be prepared to wait for some time, as automation is a non-trivial process.
You can see that the automation has finished either by the fact that the Start Automation button is enabled again, or on the Monitoring page, by choosing the project in Monitoring and looking at the progress shown in the Training results /status frame.
Annotation
To see the tags that were automatically created during the previously described, go to Home and choose the Automation page. Then select a project and a file, analogically to Annotation. The page, which is demonstrated below will be displayed. The navigation, export and the marking of finished documents is the same as in Annotation.
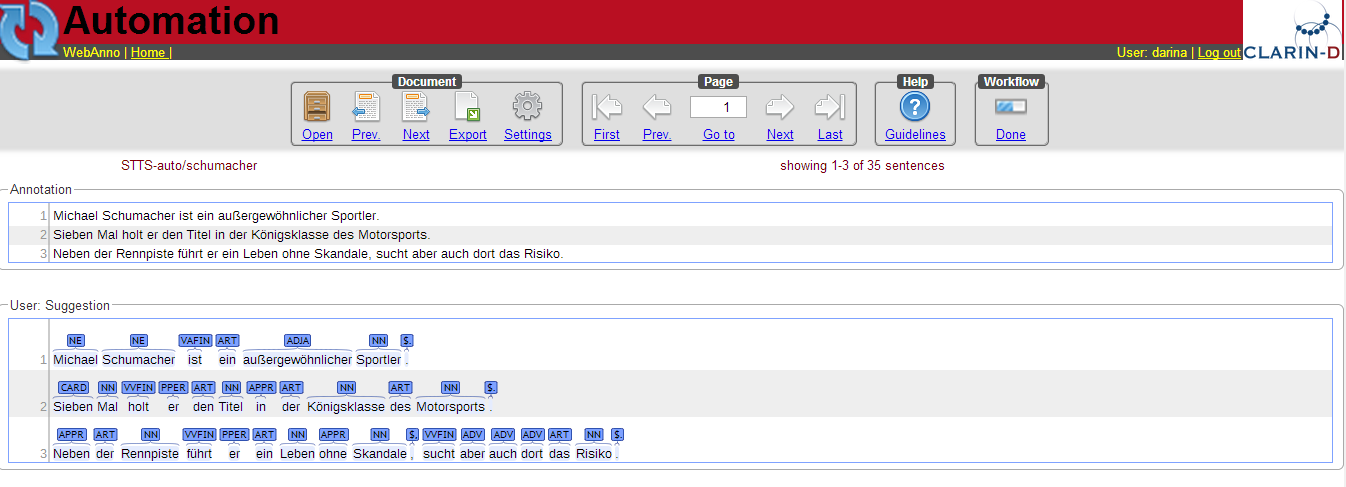
In the lower part, you see two horizontal frames, the lower one showing the automatically created annotation. By clicking on the tags, they are selected and therefore appear in the upper frame Annotation. You may see that selected tags turn grey in the Automation frame and blue in the Annotation frame. You may also add new tags to the Annotation, just like on the Annotation page.
Projects
| This functionality is only available to project managers (managers of existing projects), project creators (users with the ability to create new projects), and administrators. Project managers only see projects in which they hold the respective roles. Project creators only see projects in which they hold the project manager role. |
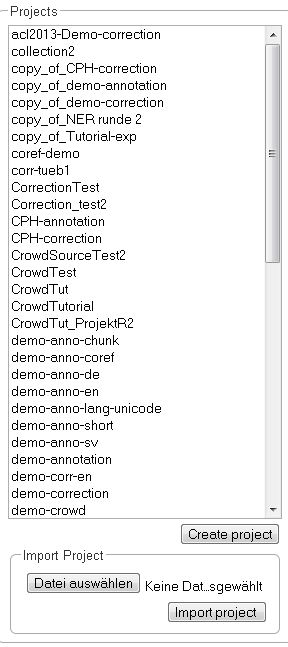
This is the place to specify/edit annotation projects. You can either select one of the existing projects for editing, or click Create Project to add a project.
Although correction and automation projects function similarly, the management differs after the creation of the document. For further description, look at the corresponding chapters Automation, Correction.
Only superadmins are allowed to create projects. Click on Create Project to create a new project.
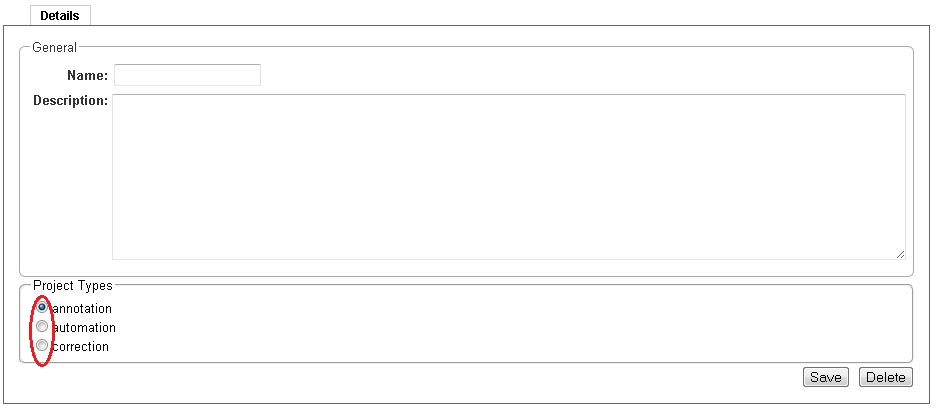
After doing so, a new pane is displayed, where you can name and describe your new project. It is also important to chose the kind of project you want to create. You have the choice between annotation, automation and correction. Please do not forget to save.
After saving the details of the new project, it can be treated like any other already existing one. Also, you are displayed a new pane with many options to organize it.
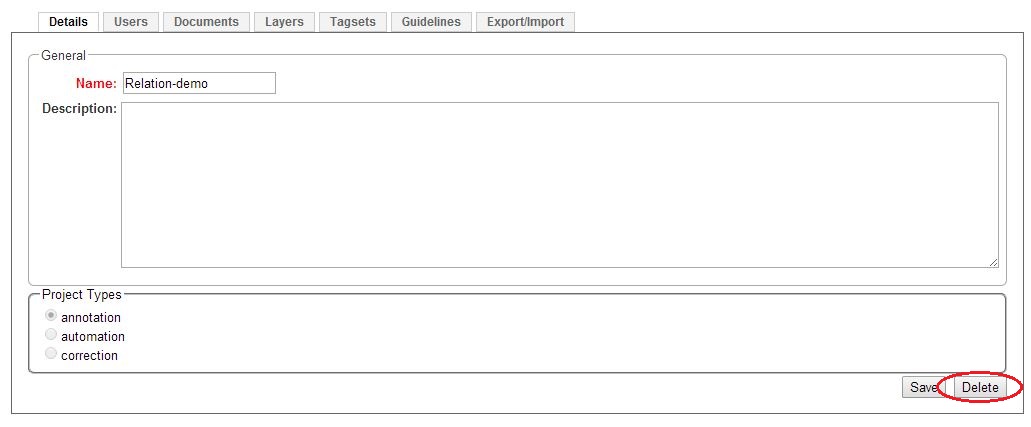
To delete a project, click on it in the frame Details. Then you are displayed the details of the project. Click on Delete.
The pane with the options to organize and edit a project, as described above, can also be reached by clicking on the desired project in the left frame.
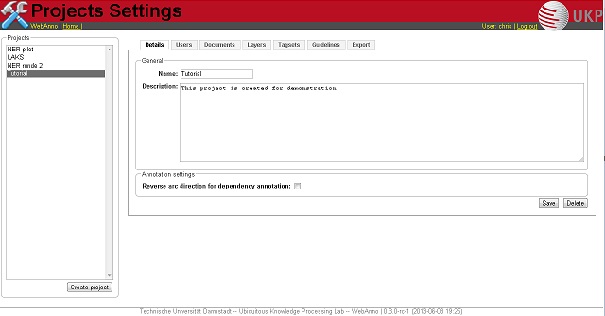
By clicking on the tabs, you can now set up the chosen project.
Users
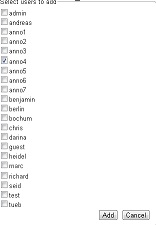
After clicking on Users, you are displayed a new pane in which you can add new users by clicking on the button Add User. After doing so, you get a list of users in the system which can be added to the project. By making a tick in front of the log in you can chose a new user.
Please do not forget to save after choosing all members of the project. Close the pane by clicking on Cancel. The rights of users created like this are that of an annotator. If you want to expand the user’s status, you can do so by clicking on the user and then on Change permission. The following frame will pop up.

After ticking the wished permissions, click update. To remove a user, click on the login and then Remove User.
Documents
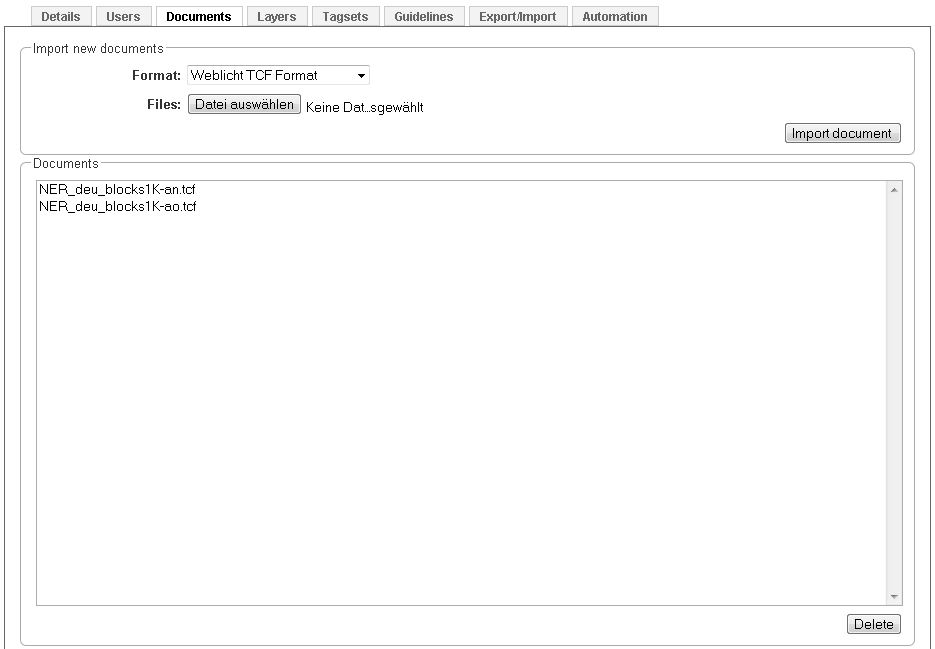
To add or delete documents, you have to click on the tab Documents in the project pane. Two frames will be displayed. In the first frame you can import new documents.

Choose a document by clicking on Choose files. Please mind the format, which you have to choose above. Then click on Import document. The imported documents can be seen in the frame below. To delete a document from the project, you have to click on it and then click on Delete in the right lower corner.
Layers
To administer the layers, click on Layer. A frame showing all existing layers in this project will appear. There are a couple of built-in layers.
| Layer | Type |
|---|---|
Chunk |
Span |
Coreference |
Chain |
Dependency |
Relation |
Lemma |
Span |
Named Entity |
Span |
Part of Speech (POS) |
Span |
The colouring of the layers signal the following:
green |
built-in annotation layer, enabled |
blue |
custom annotation layer, enabled |
red |
disabled annotation layer |
By default, only the default layer will be displayed as enabled. To disable a layer, which means that it will not be shown to the users of the project, first select the layer by clicking on it. The following frames will open.
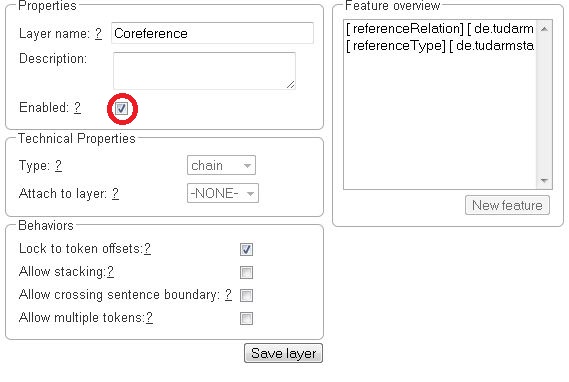
In the first frame, there is field Enabled, which can be ticked or unticked. By unticking the field it can be made invisible to the users. Layers cannot simply be deleted.
Properties
To create a new layer, select Create Layer in the Layers frame. Then, the following frame will be displayed.
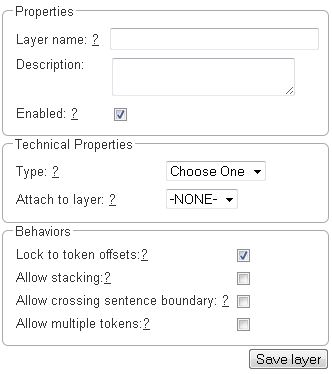
The only obligatory field in this frame is the Layer name. Above, the user can give a description to the new layer. The tick after enabled signals whether the layer is shown to the users of the project, as it was already explained above.
In the frame Technical Properties, the user may select the type of annation that will be made with this layer: span, relation or chain. Span annotations cover an optional range of characters - tokens, words or sentences.
Relation and chain annotations are used for annotating links between two spans.
For relation and chain annotations the type of the spans which are to be connected can be chosen in the field Attach to layer. Here only non-default layers are displayed. To create a relation or chain annotation, first the span annotation needs to be created.
Behaviours
In the last frame, Behaviours, other properties of the annotation may be selected. The first field, Lock to token offsets, gives the possibility to bind the annotation to a token. The next field, Allow stacking, gives the possibility to make several annotations over one range. The third field, Allow crossing sentence boundary gives the possibility to annotate a range covering more than one sentence. After clicking on Save layer only changes in the first frame (Properties) may be made. After the layer has been saved, it will be displayed in the Layer frame.
Features
To be able to make annotations with this layer, features need to be added. This can be done by choosing the layer and clicking on New feature in the Feature overview frame. Then the following frame will be displayed:
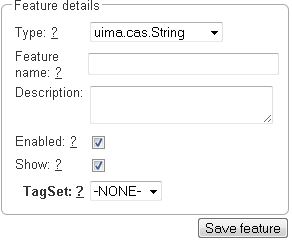
In this frame details of the features may be chosen. In the first field, the user may choose between different object types the tags of the feature are going to have (string, integer, float or boolean). A name and a description may also be given to the feature. The field Enabled shows whether the feature can be chosen by users. The field Show shows whether the feature is shown to the user. The field Remember defines whether the annotation detail editor should carry values of this feature over when creating a new annotation of the same type. This can be useful when creating many annotations of the same type in a row. A tagset may be chosen in the last field. Only non-default tagsets may be chosen. Tagsets may be created in the Tagsets frame above. The next chapter explains how to create new tagsets in detail.
Please take care that when working with non-custom layers, they have to be ex- and imported, if you want to use the resulting files in e.g. correction projects.
Tagsets
To administer the tagsets, click on the tab Tagsets in the project pane.
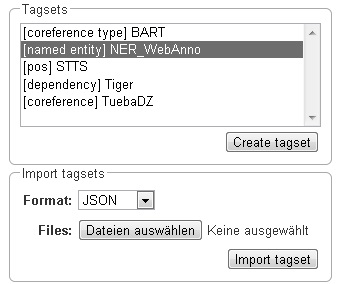
To administer one of the existing tagsets, select it by a click. Then, the tagset characteristics are displayed.
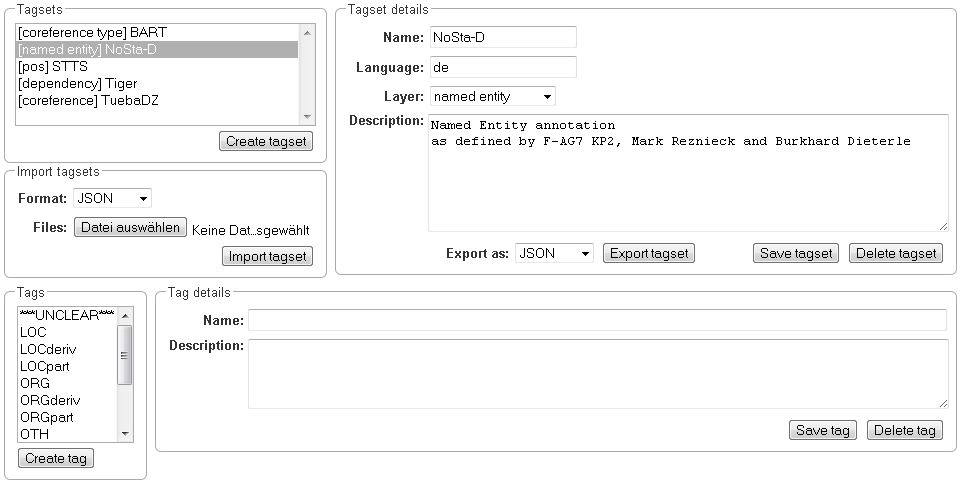
In the Frame Tagset details, you can change them, export a tagset, save the changes you made on it or delete it by clicking on Delete tagSet. To change an individual tag, you select one in the list displayed in the frame Tags. You can then change its description or name or delete it by clicking Delete tag in Tag details. Please do not forget to save your changes by clicking on Save tag. To add a new tag, you have to click on Create tag in Tag details. Then you add the name and the description, which is optional. Again, do not forget to click Save tag or else the new tag will not be created.
To create an own tagset, click on Create tagset and fill in the fields that will be displayed in the new frame. Only the first field is obligatory. Adding new tags works the same way as described for already existing tagsets. If you want to have a free annotation, as it could be used for lemma or meta information annotation, do not add any tags.
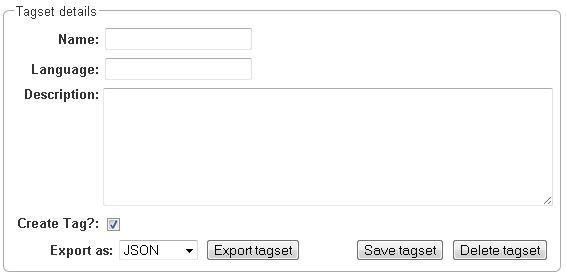
To export a tagset, choose the format of the export at the bottom of the frame and click Export tagset.
Guidelines
To add or delete guidelines, which will be accessible by users in the project, you have to select the tab Guidelines. Two new frames will be displayed. To upload guidelines, click on Choose files in the first frame – Add guideline document, select a file from your local disc and then click Import guidelines.

Uploaded guidelines are displayed in the second frame – Guideline documents. To delete a guideline document, click on it and then on Delete in the right lower corner of the frame.
Import
| This functionality is only available to administrators. |
Projects are associated with the accounts of users that act as project managers, annotators, or curators. When importing a previously exported project, you can choose to automatically generate missing users (enabled by default). If this option is disabled, projects still maintain their association to users by name. If the respective user accounts are created manually after the import, the users will start showing up in the projects.
| Generated users are disabled and have no password. The must be explicitly enabled and a password must be set before the users can log in again. |
Export

WebAnno offers two modes of exporting projects:
-
Export the whole project for the purpose of creating a backup, of migrating it to a new WebAnno version, of migrating to a different WebAnno instance, or simply in order to reimport it as a duplicate copy.
-
Export curated documents for the purpose of getting an easy access to the final annotation results. If you do not have any curated documents in your project, this export option is not offered.
The format of the exported annotations is selected using the Format drop-down field. When AUTO is selected, the file format corresponds to the format of the source document. If WebAnno has not write support for the source format, the file is exported in the WebAnno TSV format instead.
| Do not leave the export page after initiating an export before the progress bar is complete or your WebAnno instance can become locked until it is restarted! |
| Some browsers automatically extract ZIP files into a folder after the download. Zipping this folder and trying to re-import it into WebAnno will generally not work because the process introduces an additional folder within the archive and WebAnno is unable to handle that. The best option is to disable the automatic extraction in your browser. E.g. in Safari, go to Preferences → General and disable the setting Open "safe" files after downloading. |
When exporting a whole project, the structure of the exported ZIP file is a follows:
-
<project ID>.json - project metadata file
-
annotation
-
<source document name>
-
<user ID>.XXX - file representing the annotations for this user in the selected format.
-
-
-
annotation_ser
-
<source document name>
-
<user ID>.ser - serialized CAS file representing the annotations for this user
-
-
-
curation
-
<source document name>
-
CURATION_USER.XXX - file representing the state of curation in the selected format.
-
CORRECTION_USER.XXX - correction project: original document state, automation project automatically generated suggestions
-
-
-
curation_ser
-
<source document name>
-
CURATION_USER.ser - serialized UIMA CAS representing the state of curation
-
CORRECTION_USER.ser - correction project: original document state, automation project automatically generated suggestions
-
-
-
log
-
<project ID>.log - project log file
-
-
source - folder containing the original source files
The files under annotation and curation are provided for convenience only. They are
ignored upon import. Only the annotation_ser and curation_ser folders are relevant for
import.
|
Currently, WebAnno does not allow the user to choose a specific format for bulk-exporting annotations. However, this mailing list post describes how DKPro Core can be used to transform the UIMA CAS formats into alternative formats.
Monitoring
| This functionality is only available to project managers (managers of existing projects), curators, and administrators. Curators and project managers only see projects in which they hold the respective roles. |
As an administrator, you are able to observe the progress and document status of projects you are responsible for. Moreover, you are able to see the time of the last login of every user and observe the agreement between the annotators. After clicking on Monitoring in the main menu, the following page is displayed:

In the right frame, the overall progress of all projects is displayed. on the left frame one sees all projects, that one has an administrator role in. By clicking on one of the projects on the left, it may be selected and the following view is opened:

The percentual progress out of the workload for individual annotators may be viewed as well as the number of finished documents.
Document Status
The following table will explain the different symbols, which explain the status of a document for a user and the described task.
| Symbol | Meaning |
|---|---|
|
Annotation has not started yet |
|
Document not available to user |
|
Annotation is in progress |
|
Annotation is complete |
|
Curation is in progress |
You can also alter the document status of annotators. By clicking on the symbols you can change between Done and In Progress. You can also alter between New and Locked status. The second column of the document status frame displays the status of the curation.
As there is only one curator for one document, curation is not divided into individual curators.
Scrolling down, two further frames become visible. The left one, named Layer, allows you to chose a layer in which pairwise kappa agreement between annotators will be calculated.
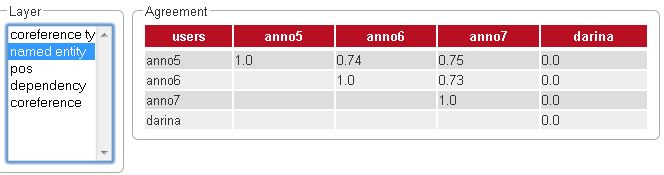
Agreement
Agreement can be inspected on a per-feature basis and it is calculates pair-wise between all annotators across all document. Agreement is calculated using Cohen’s kappa as implemented in DKPro Statistics.
The first time a feature is selected for agreement inspection, it takes a moment to calculate the differences between the annotated documents. Switching between different features subsequently is much faster.
| Multiple interpretations in the form of stacked annotations not supported in the agreement calculation! |
User Management
| This functionality is only available to administrators. |
After selecting this functionality, you are displayed a frame which shows all users. By selecting a user, a frame is displayed on the right.
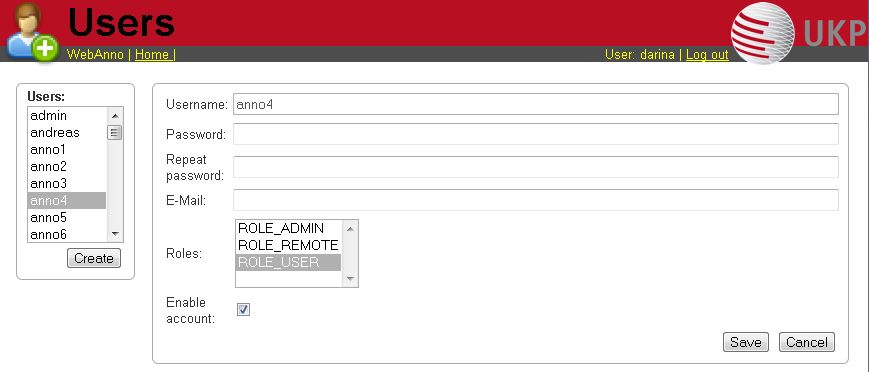
Now you may change his role or password, specify an e-mail address or dis- or enable his account by placing the tick.
| Disabling an account prevents the user from logging in. The user remains associated with any projects and remains visible in on the Monitoring page. |
To create a new user, click on Create in the left frame. This will display a similar frame as the one described in the last paragraph. Here you have to give a login-name to the new user.
In both cases, do not forget to save your changes by pressing the Save button.
-
User roles
Role |
Description |
ROLE_USER |
User. Required to log in to the application. Removal of this role from an account will prevent login even for users that additionally hold the ROLE_ADMIN! |
ROLE_ADMIN |
Administrator. Can manage users and has access to all other functionalities. |
ROLE_PROJECT_CREATOR |
Project creator. Can create new projects. |
ROLE_REMOTE |
Remote API access. Currently experimental and undocumented. Do not use. |
Formats
| Format | Read | Write | Custom Layers | Description |
|---|---|---|---|---|
Binary |
yes |
yes |
yes |
Binary UIMA CAS |
yes |
yes |
no |
POS, chunks |
|
yes |
yes |
no |
Named entities |
|
yes |
yes |
no |
Lemma, POS, dependencies |
|
yes |
yes |
no |
Lemma, POS, dependencies |
|
Plain text |
yes |
yes |
no |
No annotations |
yes |
no |
no |
Lemma, POS, dependencies, coreference, named entities |
|
TEI CPH dialect |
yes |
no |
no |
|
WebAnno TSV 1 |
yes |
no |
no |
|
WebAnno TSV 2 |
yes |
yes |
yes |
|
XMI |
yes |
yes |
yes |
UIMA XMI |
Troubleshooting
If the tool is kept open in the browser, but not used for a long period of time, you will have to log in again. For this, press the reload button of your browser.
If the tool does not react for more than 1 minute, please also reload and re-login.
We are collecting error reports to improve the tool. For this, the error must be reproducible: If you find a way how to produce the error, please open an issue and describe it.